Log homes are beautiful and durable, but they require regular maintenance to stay in top condition. Without proper upkeep, issues like moisture damage, rot, and insect infestations can develop, leading to costly repairs. To protect your investment and keep your log home looking its best, it’s important to follow a maintenance schedule. Some tasks need to be done yearly, while others only require attention every few years.
This guide will help you understand what needs to be done and how often to do it to keep your log home in peak condition.
Yearly Log Home Maintenance Tasks
Cleaning and Pressure Washing
Dirt, pollen, mildew, and other contaminants can build up on your logs, leading to discoloration and potential moisture retention. Washing your home yearly helps prevent long-term staining and decay.
- Best time: Spring and Fall
- Frequency: Twice per year
- Tip: Avoid damaging the logs by using a low-pressure wash with a mild wood cleaner.
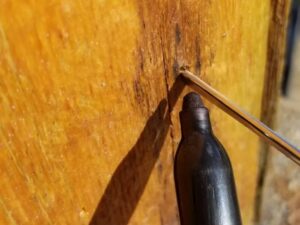
Inspecting for Damage
Regular inspections help catch minor issues before they become significant problems. Look for cracks, checks, moisture intrusion, log rot, and insect activity around the exterior of your cabin.
- Best time: Spring and Fall
- Frequency: At least once per year, but preferably twice
- Tip: Pay close attention to log ends, window and door frames, and any areas near the foundation or without regular sunlight, such as shaded areas or the north wall.
Chinking and Caulking Checks
Chinking and caulking prevent air and moisture from penetrating your home. Over time, they can shrink or crack, allowing water and pests inside.
- Best time: Spring and Fall
- Frequency: Once per year, touch up as needed
- Tip: Use a high-quality, flexible sealant compatible with your logs and climate. Pay special attention to cracks that can hold standing water.
Log Home Maintenance Tasks for Every 2-3 Years
Staining and Sealing
Stain protects logs from UV damage and moisture. Depending on climate and exposure, reapplication may be needed more often.
- Best time: Late Spring to Early Fall
- Frequency: Every 2-3 years
- Tip: Check if water beads up or absorbs into the logs. If it absorbs quickly, it’s time to reapply stain.
Every 3-5 Years
Log Repairs and Replacement
To maintain structural integrity, logs showing rot, deep cracking, or insect damage should be repaired or replaced.
- Best time: Whenever necessary, ideally in dry weather
- Frequency: As needed, but logs should be assessed every 3-5 years
- Tip: Use borate treatments to help prevent future rot and insect damage.
Gutter and Drainage Maintenance
Proper drainage keeps water away from your home’s logs, reducing the risk of moisture damage.
- Best time: Spring and Fall
- Frequency: Every 3-5 years for replacement; cleaned at least twice per year
- Tip: Extend downspouts away from the home to prevent water pooling near the foundation.
As Needed or Special Considerations
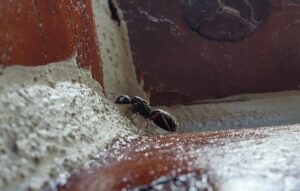
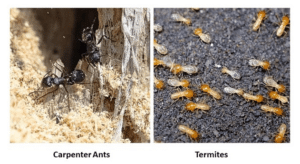
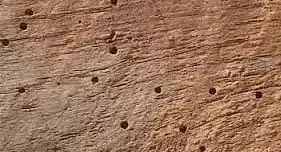
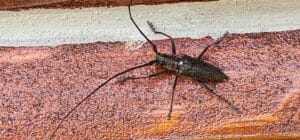
Pest Control Treatment
Wood-boring insects like termites, borer beetles, carpenter ants, and carpenter bees can cause severe damage to logs. Applying borate treatments can help prevent infestations.
- Frequency: As needed, depending on pest activity and climate
- Tip: Keep firewood and mulch away from the home to deter pests.
Roof and Flashing Inspection
A well-maintained roof prevents leaks that could cause log rot.
- Frequency: Yearly, or after major storms
- Tip: Ensure all flashing is secure and gutters are directing water away properly.
Foundation and Landscaping Maintenance
Keeping plants, soil, and mulch away from logs helps prevent moisture buildup. You should also keep an eye on log home settling as it can create additional problems over time.
- Frequency: Ongoing monitoring, adjust seasonally
- Tip: Maintain at least a 12-inch clearance between landscaping and logs.
Is it Time for Maintenance or Restoration?
Log home maintenance doesn’t have to be overwhelming. Following a regular schedule can prevent small issues from turning into costly repairs. Keeping track of completed maintenance tasks in a log or journal can help you stay organized.
If you’re unsure about any aspect of log home maintenance, Log Masters is here to help. We offer maintenance plans to help ensure your cabin stays pristine for decades.
However, if you’re looking at this list and thinking, “I haven’t maintained any of this as recommended,” that’s okay, too. Just walk through our simple restoration checklist, then contact us with details on what your home needs so we can provide an accurate restoration estimate.
The post How Often Should You Perform Log Home Maintenance? appeared first on Log Home Restoration, Maintenance & Additions | Log Masters.
source https://logmastersrestorations.com/blog/how-often-should-you-perform-log-home-maintenance/